Contd/- PART-2
brain_df_train['mask'] = brain_df_train['mask'].apply(lambda x: str(x))
brain_df_train.info()
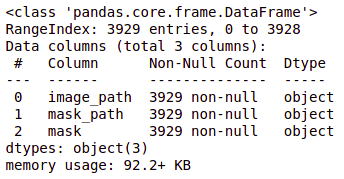
As you can see, now each feature has the datatype as an object.
# split the data into train and test data from sklearn.model_selection import train_test_split train, test = train_test_split(brain_df_train, test_size = 0.15) |
Refer here for more information on ImageDataGenerator and the parameters in detail.
We will create a train_generator and validation_generator from train data and a test_generator from test data.
# create an image generator
from keras_preprocessing.image import ImageDataGenerator

#Create a data generator which scales the data from 0 to 1 and makes validation split of 0.15
datagen = ImageDataGenerator(rescale=1./255., validation_split = 0.15)

train_generator=datagen.flow_from_dataframe(
dataframe=train,
directory= './',
x_col='image_path',
y_col='mask',
subset="training",
batch_size=16,
shuffle=True,
class_mode="categorical",
target_size=(256,256))

valid_generator=datagen.flow_from_dataframe(
dataframe=train,
directory= './',
x_col='image_path',
y_col='mask',
subset="validation",
batch_size=16,
shuffle=True,
class_mode="categorical",
target_size=(256,256))

# Create a data generator for test images
test_datagen=ImageDataGenerator(rescale=1./255.)

test_generator=test_datagen.flow_from_dataframe(
dataframe=test,
directory= './',
x_col='image_path',
y_col='mask',
batch_size=16,
shuffle=False,
class_mode='categorical',
target_size=(256,256))
Now, we will learn the concept of Transfer Learning and ResNet50 Model which will be used for further training model.
Transfer Learning as the name suggests, is a technique to use the pre-trained models in your training. You can build your model on top of this pre-trained model. This is a process that helps you decrease the development time and increase performance.
ResNet (Residual Network) is the ANN trained on the ImageNet dataset that can be used to train the model on top of it. ResNet50 is the variant of the ResNet model which has 48 Convolution layers along with 1 MaxPool and 1 Average Pool layer.
# Get the ResNet50 base model (Transfer Learning)
basemodel = ResNet50(weights = 'imagenet', include_top = False, input_tensor = Input(shape=(256, 256, 3)))
basemodel.summary()
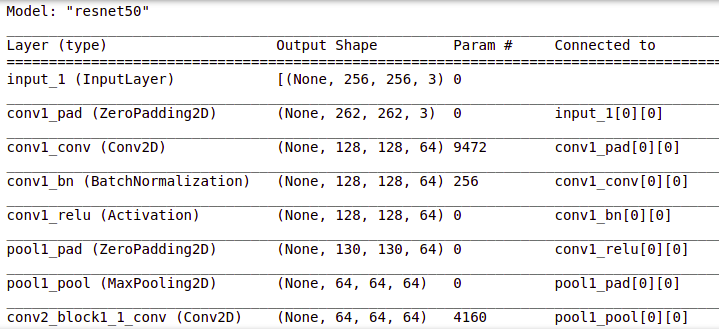
You can view the layers in the resnet50 model by using .summary() as shown above.
# freeze the model weights
for layer in basemodel.layers:
  layers.trainable = False
headmodel = basemodel.output
headmodel = AveragePooling2D(pool_size = (4,4))(headmodel)
headmodel = Flatten(name= 'flatten')(headmodel)
headmodel = Dense(256, activation = "relu")(headmodel)
headmodel = Dropout(0.3)(headmodel)
headmodel = Dense(256, activation = "relu")(headmodel)
headmodel = Dropout(0.3)(headmodel)
headmodel = Dense(256, activation = "relu")(headmodel)
headmodel = Dropout(0.3)(headmodel)
headmodel = Dense(2, activation = 'softmax')(headmodel)

model = Model(inputs = basemodel.input, outputs = headmodel)
model.summary()
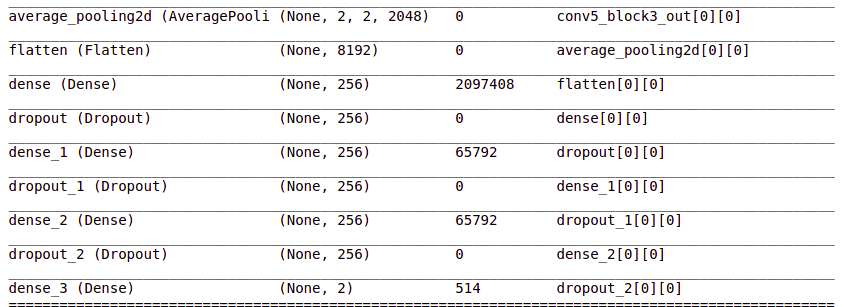
These layers are added and you can see them in the summary.
# compile the model
model.compile(loss = 'categorical_crossentropy', optimizer='adam', metrics= ["accuracy"])
Read more about EarlyStopping.
Read more about ModelCheckpoint parameters.
# use early stopping to exit training if validation loss is not decreasing even after certain epochs
earlystopping = EarlyStopping(monitor='val_loss', mode='min', verbose=1, patience=20)

# save the model with least validation loss
checkpointer = ModelCheckpoint(filepath="classifier-resnet-weights.hdf5", verbose=1, save_best_only=True)
model.fit(train_generator, steps_per_epoch= train_generator.n // 16, epochs = 1, validation_data= valid_generator, validation_steps= valid_generator.n // 16, callbacks=[checkpointer, earlystopping])
# make prediction
test_predict = model.predict(test_generator, steps = test_generator.n // 16, verbose =1)

# Obtain the predicted class from the model prediction
predict = []
for i in test_predict:
  predict.append(str(np.argmax(i)))
predict = np.asarray(predict)
# Obtain the accuracy of the model
from sklearn.metrics import accuracy_score

accuracy = accuracy_score(original, predict)
accuracy

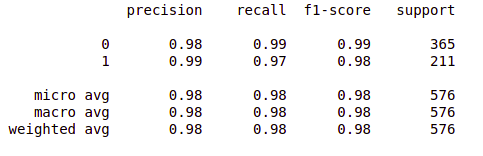
from sklearn.metrics import classification_report
report = classification_report(original, predict, labels = [0,1])
print(report)
So far so good!
Now, you can pat yourself as you have just completed the first part i.e., brain tumor detection. Now, we will head towards brain tumor segmentation in the second part of this series.
mifratech datascience and machine learning final year project
mifratech - data science and machine learning project ideas
mifra projects- data science and machine learning projects
mifratech is the best for data science final year project
mifra data science final year projects
yelahanka projects 15 machine learning and data science project ideas with datasets
bangalore data science and ml projects
indian institute of data science and artificial intelligence
best engineering colleges project developement company for final year rngineering students
mifratech is registered under mca and approved by aicte and msme and
mifratech is the best for engineering students cse projects
mifratech is the best engineering project developement for electronics and computer science students
best place to buy a project here, including documentation
data science machine learning projects
data science related projects
best projects on data science
data for machine learning projects mifratech is the best place purchase software products
bm data science and machine learning capstone project github
projects on data science and machine learning
how to operationalize machine learning and data science projects pdf
ibm data science and machine learning capstone project quiz answers
Note : Find the best solution for electronics components and technical projects ideas
keep in touch with our social media links as mentioned below
Mifratech websites : https://www.mifratech.com/public/
Mifratech facebook : https://www.facebook.com/mifratech.lab
mifratech instagram : https://www.instagram.com/mifratech/
mifratech twitter account : https://twitter.com/mifratech
Contact for more information : [email protected] / 080-73744810 / 9972364704