
What you need.
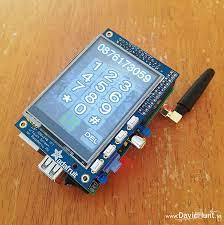
As David Hunt puts it, "the PiPhone project runs on Python" - so make sure that your Raspberry Pi is equipped with Python development libraries, WiringPi and Hunt's custom PiPhone Python script. Once you've got all that in place, connect the Raspberry Pi to the PiTFT touchscreen.
Using the cables, link the battery to the switch, and the switch to the GSM module. Connect the GSM module's header to the DC-DC converter, and run a cable from the converter to the Raspberry Pi. "The DC-DC converter will transform the lithium-ion battery's 3.7V into the Pi's 5V," Hunt says.
Use two more cables to connect the GSM module's receive and transmit pins (Rx and Tx) to Raspberry Pi's port. Then insert the SIM card into the module. "Some people ask me whether you have to pay for the calls when using the PiPhone," Hunt says. "Unfortunately, yes - you need a SIM card."
Lay the Raspberry Pi on the foam-board square. Use the Velcro pieces and duct tape to fix the GSM module, the switch and the converter on the other side of the square. Place the battery between the Raspberry Pi and the screen. "Don't keep the PiPhone turned on, or the processor will get warm," Hunt says.
Flick the switch to turn your PiPhone on. Plug the headphones and the microphone into the GSM module and dial the number you want to call on the touchscreen. "I am not sure of the exact battery life, but I think it should go on for at least three hours without charging," says Hunt.