Introduction
The advancement of artificial intelligence and embedded systems has opened the doors to the development of intelligent autonomous vehicles capable of navigating complex environments without human assistance. The Smart Self-Navigating Car Using Raspberry Pi is a compact prototype that aims to replicate the basic functionalities of a self-driving car using cost-effective and open-source tools.
This project is designed to autonomously detect lane paths, avoid obstacles, and make real-time driving decisions. The system is built around a Raspberry Pi microcomputer, which processes visual data captured from a Pi Camera using computer vision techniques. The car can follow a designated path by identifying lane lines and adjusting its steering and speed based on the processed information. Obstacle detection is implemented using an ultrasonic sensor, allowing the vehicle to halt or navigate around obstacles in its path.
This project serves as an excellent introduction to autonomous vehicle technology, combining elements of image processing, real-time control systems, sensor integration, and robotics. It provides hands-on experience in building intelligent machines and paves the way for further development into real-world applications.
Working Principle
The smart car operates based on the fusion of data obtained from a camera and an ultrasonic sensor. The Pi Camera captures continuous video frames of the car’s front view, which are processed using computer vision algorithms running on the Raspberry Pi. These algorithms detect the road’s lane markings and calculate the car’s required alignment to stay centered in the lane.
Simultaneously, an ultrasonic sensor mounted at the front measures the distance between the car and any objects in its path. When an obstacle is detected within a predefined threshold, the Raspberry Pi issues a stop or turn command.
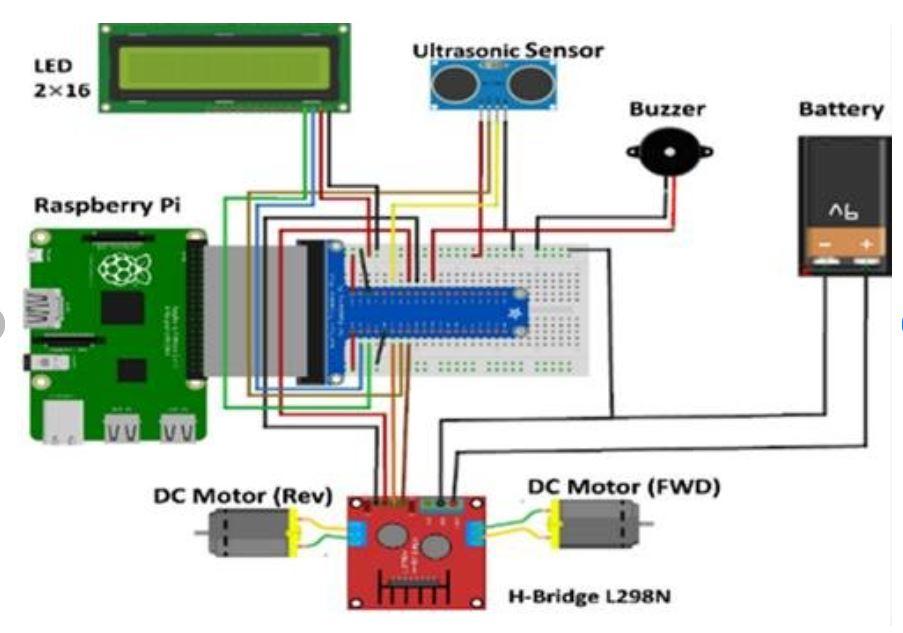
The Raspberry Pi processes this visual and distance information in real-time and sends control signals to the motor driver module, which drives the DC motors to steer and move the car accordingly. This continuous feedback loop allows the car to navigate its environment without human input.
Methodology
The implementation of the self-navigating car is carried out through the following systematic approach:
-
Real-Time Video Capture and Preprocessing
-
A Raspberry Pi Camera is used to capture live video of the car's forward path.
-
Each video frame is converted to grayscale to reduce processing load and filtered using Gaussian blur to remove noise.
-
Edge detection is performed using the Canny Edge Detection algorithm to highlight lane boundaries.
-
Lane lines are extracted using Hough Line Transform, and their slopes are analyzed to determine the direction of the lane.
-
Lane Tracking and Direction Control
-
A central path is calculated between the detected lane lines.
-
The difference between the vehicle’s current position and the center of the path is calculated to determine steering correction.
-
Based on this, left, right, or forward motion commands are generated.
-
Obstacle Detection
-
An HC-SR04 Ultrasonic Sensor continuously monitors the distance to any object ahead.
-
If an object is detected within a minimum distance threshold (e.g., 15 cm), the car stops or redirects its path.
-
Motor Control
-
An L298N Motor Driver Module receives signals from the Raspberry Pi based on navigation decisions.
-
This module controls the direction and speed of two DC motors, which drive the rear wheels of the car.
-
Continuous Feedback Loop
Components Used
| Component |
Description |
| Raspberry Pi 3 / 4 |
Acts as the main processor, running the Python scripts and OpenCV algorithms. |
| Raspberry Pi Camera |
Captures real-time video for lane detection and navigation processing. |
| L298N Motor Driver |
Controls the direction and speed of the motors based on input from the Pi. |
| DC Motors (2 units) |
Provide motion to the car’s rear wheels, allowing forward, backward, and turning movements. |
| Ultrasonic Sensor (HC-SR04) |
Measures distance to detect obstacles in the path of the car. |
| Car Chassis with Wheels |
Provides the physical structure and mobility for mounting all components. |
| Battery Pack (7.4V or 12V) |
Supplies power to Raspberry Pi and motor driver circuit. |
| Jumper Wires |
Establish electrical connections between all the hardware components. |
| Breadboard / PCB |
Used for organizing and securing the circuit connections systematically. |
Block Diagram:

IMAGES USED ARE ONLY FOR SAMPLE PURPOSES!!!!!!

.svg)