1. Introduction
Water leakage is a serious issue that can lead to extensive property damage, mold growth, short circuits, and high water bills if not detected early. In many homes, offices, and industries, leaks go unnoticed until the damage becomes visible, often too late for preventive action.
To address this, we propose a smart water leakage detection system using a Raspberry Pi Zero, a compact and cost-effective microcontroller. This system continuously monitors water-sensitive areas using sensors and provides real-time alerts using visual, audible, and IoT-based mechanisms. It is suitable for locations like under sinks, near tanks, around pipelines, or in server rooms.
The Raspberry Pi Zero's built-in computing power and GPIO interface make it ideal for handling sensors, actuators, and communication modules while keeping the design compact and energy-efficient.
2. Working Principle
The system works on the conductivity principle using a water leak sensor, which detects the presence of water by measuring the resistance between its terminals. In dry conditions, the resistance is high (no conduction), and when water is present, the resistance drops, completing a circuit.
Here's how it functions:
-
When water comes into contact with the sensor terminals, it conducts electricity.
-
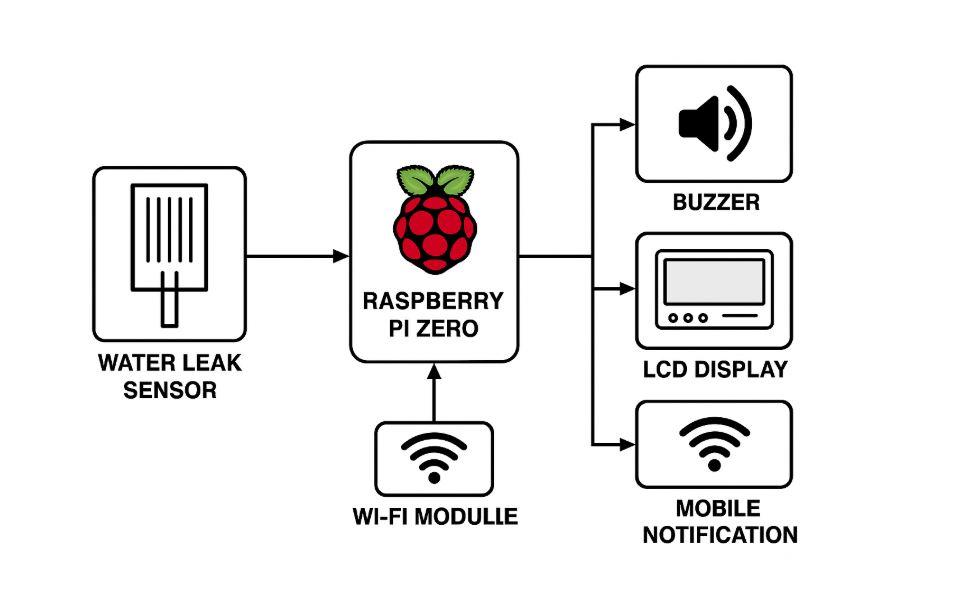
This signal is read by the Raspberry Pi Zero via a GPIO pin.
-
Based on this input, the Raspberry Pi executes a pre-programmed script to:
-
Activate a buzzer or LED for immediate local alert.
-
Display a warning message on an LCD.
-
Optionally, send notifications through cloud services or mobile apps (via Wi-Fi).
This setup helps detect leaks at an early stage and alert the user instantly to take corrective action.
3. Methodology
The step-by-step working of the system is as follows:
🔸 Step 1: Sensor Monitoring
🔸 Step 2: Leakage Detection
🔸 Step 3: Processing Signal
🔸 Step 4: Alert Mechanism
-
Local Alert: Turns ON a buzzer and/or LED.
-
Visual Alert: Displays a message like "Water Leak Detected!" on the LCD.
-
Remote Alert (optional): Sends a notification to a mobile device via:
-
Email
-
Blynk App
-
Telegram bot
-
IFTTT service
🔸 Step 5: Logging (optional)
4. Components Used
| Component |
Explanation |
| Raspberry Pi Zero (or Zero W) |
Acts as the main controller. Processes input from the sensor and triggers alerts. The Zero W version includes Wi-Fi for IoT functionality. |
| Water Leak Sensor (e.g., Raindrop Sensor, YL-83) |
Senses water presence via conductivity. Outputs a digital signal. |
| Buzzer |
Emits an audible alert when a leak is detected. Useful for nearby notification. |
| LED (optional) |
Provides a visual indication of leak detection. Helpful in noisy environments. |
| 16x2 I2C LCD Display (optional) |
Displays real-time system status and leak alerts. Uses I2C protocol to save GPIO pins. |
| Wi-Fi Module (built-in or external) |
Enables sending alerts over the internet using apps or cloud platforms. |
| Power Supply (5V 2A) |
Powers the Raspberry Pi and connected peripherals. Can be battery or USB-based. |
| Resistors & Jumpers |
Used for signal conditioning and connecting components on a breadboard. |
| Breadboard or PCB |
Prototyping platform to build the circuit neatly and securely. |
Block Diagram:


.svg)