INTRODUCTION
In most households, drying clothes under natural sunlight is the most common and effective method. However, this process often becomes problematic due to unexpected rainfall, especially during the monsoon season. Clothes that are left outside to dry may get soaked again, causing inconvenience, wastage of time, and additional effort for the user. Similarly, leaving windows open during rain can allow water to enter the house, leading to damage of furniture, electrical appliances, and overall discomfort inside the living space. These issues highlight the need for an automated solution that can respond quickly to changing weather conditions without human intervention.
With the advancement of microcontroller technology and the increasing availability of low-cost sensors, automation has found its way into daily household activities. The Smart Rain Avoidance for Clothes project is developed to address this practical problem by integrating a rain sensor, Arduino Nano, and servo motors to build an intelligent system. The rain sensor detects the presence of raindrops and sends real-time feedback to the Arduino controller. Based on this input, the Arduino operates two servo motors: one to move the clothesline into a sheltered area, and another to automatically close the window. When the rain stops, the system reverts the clothesline to its original outdoor position and reopens the window, ensuring continuous airflow and effective drying.
The system is designed to be simple, cost-effective, and energy-efficient, making it suitable for households, hostels, and apartments. It eliminates the need for manual monitoring and intervention, which is especially useful when occupants are away from home. Additionally, the project demonstrates the application of automation in everyday life, contributing to the broader concept of smart home technologies.
Overall, this project not only solves a common household issue but also showcases how embedded systems and automation can be applied to improve comfort, convenience, and efficiency in daily living.
FLOW CHART

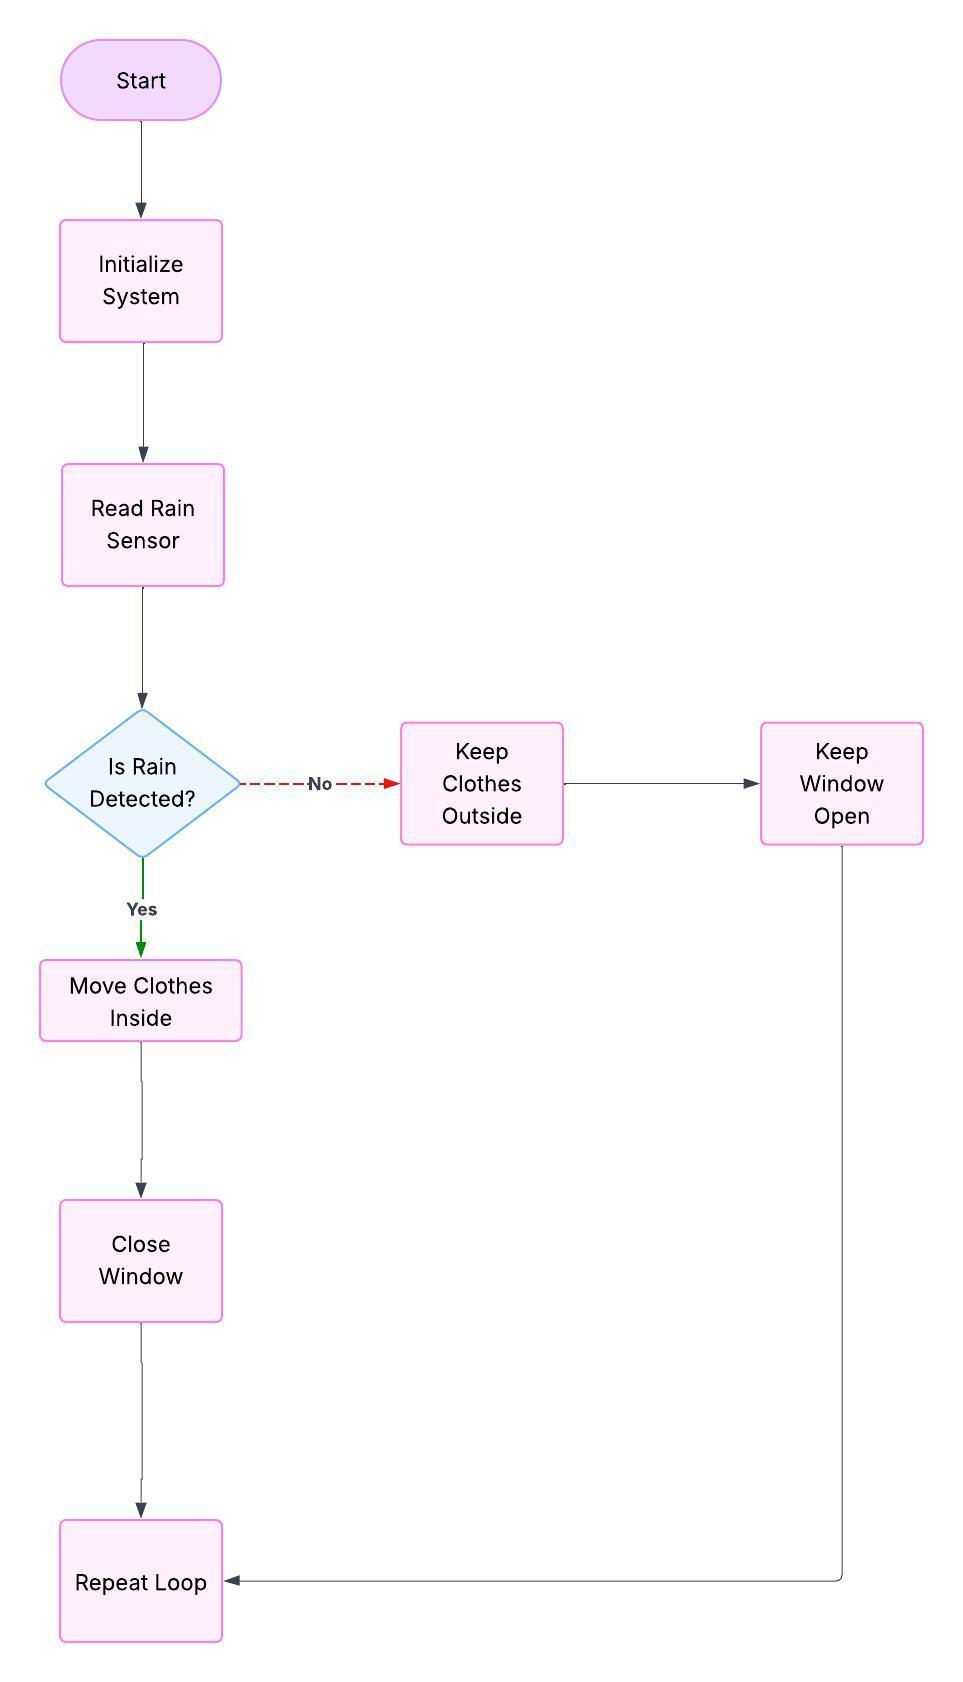
The flow chart represents the sequence of operations carried out by the system to detect rain and actuate the servo motors for clothes movement and window control. It simplifies the process into decision-making steps and shows how the system continuously loops to ensure real-time monitoring.
Step-by-Step Flow
1. Start
o The system is powered on, and the Arduino Nano initializes the input/output pins. Both servo motors are set to their default positions (clothes outside, window open).
2. Initialize Components
o Rain sensor pin configured as input.
o Servo 1 (clothes) and Servo 2 (window) attached to Arduino.
o Serial communication starts for monitoring.
3. Read Rain Sensor
o The Arduino continuously checks the rain sensor to detect whether raindrops are present.
4. Decision: Rain Detected?
o If the rain sensor gives a HIGH signal, it indicates rainfall.
o If the rain sensor gives a LOW signal, it indicates no rain.
5. If Rain Detected (YES branch):
o Servo 1 rotates to 60° → moves clothes into the sheltered area.
o Servo 2 rotates to 90° → closes the window.
o Display message on Serial Monitor: “Rain detected! Moving clothes and closing window.”
6. If No Rain (NO branch):
o Servo 1 remains at 0° → keeps clothes outside.
o Servo 2 remains at 0° → keeps window open.
o Display message on Serial Monitor: “No rain. Keeping clothes outside and window open.”
7. Delay for Stability
o The system waits for a short delay (1000 ms) before repeating to prevent fluctuations.
8. Repeat Loop
o The process repeats continuously, ensuring real-time detection and actuation.
BLOCK DIAGRAM

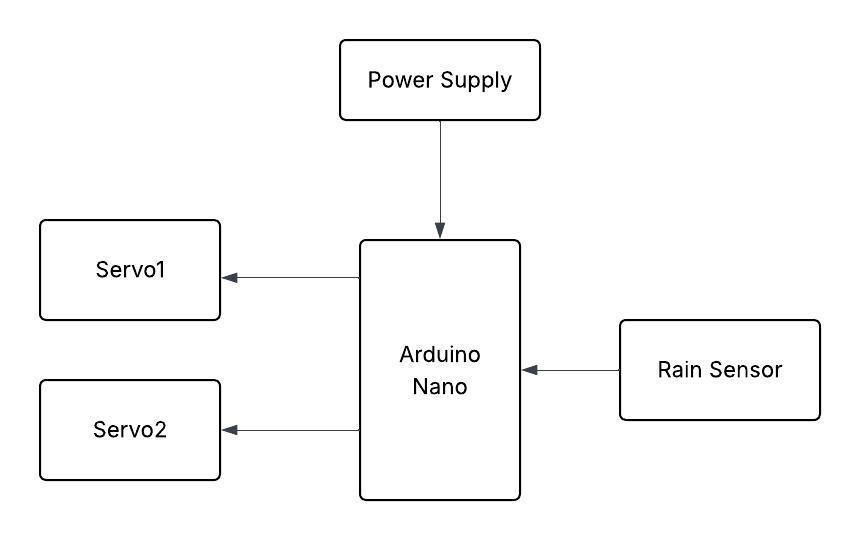
The block diagram of the system provides a simplified representation of the hardware components and their interconnections. It highlights how the rain sensor, Arduino Nano, and servo motors interact to achieve the automatic rain avoidance mechanism.
1. Components in the Block Diagram
1. Power Supply
o Provides regulated power (5V) to Arduino Nano, rain sensor, and servo motors.
o Ensures stable operation of the circuit.
2. Rain Sensor Module
o Continuously detects rainfall by measuring water droplets on its surface.
o Sends a digital signal (HIGH/LOW) to the Arduino Nano.
o Output HIGH → Rain detected, Output LOW → No rain.
3. Arduino Nano (Microcontroller)
o Acts as the central control unit.
o Receives input from the rain sensor.
o Based on sensor readings, it sends PWM control signals to the servo motors.
o Executes the programmed logic for rain detection and actuation.
4. Servo Motor 1 (Clothes Movement)
o Connected to a mechanical setup for moving clothesline between outdoor and sheltered positions.
o Receives control signals from Arduino Nano.
o Operates at two angles: 0° (clothes outside) and 60° (clothes inside shelter).
5. Servo Motor 2 (Window Control)
o Connected to window mechanism.
o Controlled by Arduino Nano.
o Operates at two angles: 0° (window open) and 90° (window closed).
2. Signal Flow
- Step 1: The power supply energizes all modules.
- Step 2: Rain sensor detects presence/absence of rain and sends signal to Arduino Nano.
- Step 3: Arduino Nano processes the input signal.
- Step 4: Based on logic, Arduino sends PWM signals to Servo Motor 1 and Servo Motor 2.
- Step 5: Servo 1 moves clothesline, Servo 2 adjusts window position.
- Step 6: The system loops continuously for real-time operation.

.svg)

